From code to a product, an idea of an application goes through various steps including coding, designing, etc. Well, if you have covered the whole procedure, now it’s time to publish that on the Play Store.
One thing to note here is that publishing applications on the Play Store involves numerous steps. From app information and metadata to uploading the app bundle and apk, everything needs to be buttery smooth.
To ensure this kind of experience, you have to stay aware of all challenges. So, read the article till the end. Also learn about Proton VPN Is Now Free To Use On Android by reading this article.
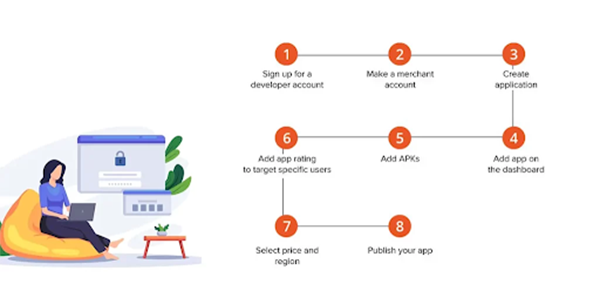
Step-by-Step Process on How to Publish Android App on Google Play Store
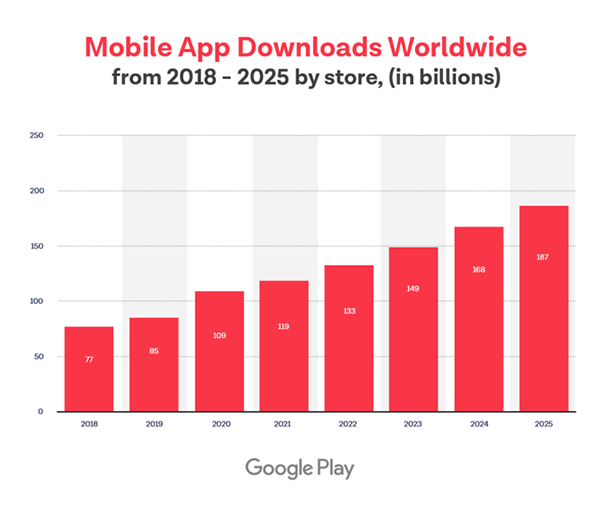
Did you know? There are 2.61 billion apps and games that are available to download on Google Play. The next one will be yours.
For that, it is noteworthy to know about all the steps and challenges related to the subject, so, here are explanations of how to complete each step at its full glory:
Google Play Developer Console
Google Play Console or Google Play Developer Console is a backend program that allows developers to post or update their programs. The platform charges a one-time amount of $25 to set up your account. Filled with numerous features and control functions, this console is the entry gate to the list.
Follow the given list if you want to learn how to make an account on the developer console:
- Enter your details including your name, country, etc.
- Follow the further steps as directed.
- Make a payment of $25.
- Wait for 48 hours until Google sends you a confirmation mail.
Link Developer Account With Google Wallet Merchant Account
Many people still wonder how game or app developers make money. Well, a significant portion of their earnings come from in-app purchases. If you want your program to have the feature of in-app purchases as well, you must link your developer account to the Google Wallet merchant account.
This Google Wallet is exactly the place where you will receive all your money:
- Sign in to your Google Developer Account.
- Click on “Reports”.
- Hit the “Financial Reports” button.
- Finally, click on “Set up a merchant account now” and follow the steps as directed.
Create Application
After you have completed the above-mentioned steps, go to the “My Application” section and hit the “Create Application” button. Further, select the app language and the title of your application.
After following these steps, it’s finally time to hit the CREATE button and flag your first application.
App Store Listing
Listing is the stage where you will be testing the waters. Here, you need to be well-researched and introduced to your final product. Since now the Play Store is expecting you to hand over your application to the list, it will demand each detail associated with the app.
Some expected fields may require you to describe the application in keywords. So, it is advised to use keywords thoughtfully.
Upload App Bundles and APKs
Bravo! You’ve completed 50% of the progress. Now, at this stage, you have to be ready with all the files and data of your application. Once ensured that they are handy:
- Go to the Release Management section.
- Hit the App Release tab from the menu.
- Choose among four options, an internal test, a close test, a production release, and an open test.
- Hit the “Create Release” button.
- Pick an option whether you want Google Play apps to sign in or not.
- Hit on “Browse Files” and upload the apk following instructions.
- If everything’s okay, hit “Save”. To reassure, hit “Review”.
Content Rating
As the developer of your own application, you hold the first duty to rate your work. An unrated application is the first target by the Play Store to be removed.
- Visit the left side of the menu, and click on the “content rating” option.
- Hit the “Continue” button.
- Enter all the details in respective fields.
- Click on the “Confirm” button.
- Fill up the questionnaire and proceed with the “Save the Questionnaire” button.
- Hit the “Calculate Rating” button.
- Hit the “Apply” button.
Confirm the App Pricing and Distribution
One thing you must note in your mind is that the Play Store does not allow any application to be released across the world. It depends upon this stage where countries, where the app is to be published, are selected.
Secondly, here you are also expected to set a price on your application. But, there are some complications attested with both of your decisions.
While selecting the countries, you must make sure that the age restrictions follow the nature of your applications and also the regulations of the respective country. If your program is suitable for children, simply hit “Yes”. Or “No” if on the contrary.
Trivia
Consumers spent $47 billion on Google Play apps and games in 2023.
When it comes to the pricing, remember that you may alter the price in the future, but cannot make a free app, or become a paid program later. In other words, a free application will always remain free.
Voila! Hit the Publish Button!
Finally, now is the time. Once you are sure that everything is going in the right direction as expected, you are finally set to make your final clicks.
From here, you need to:
- Go back to the “App Releases”.
- From “Manage Production”, hit “Edit Release”.
- Click on the “Review” button.
- Hit the “Start rollout to production” button.
- Finally, hit the “Confirm” button.
Final Words
Publishing an application is not a short process. But, it can be done easily if all steps are followed carefully. Make sure to provide all authentic information to Google. Also, make the final decision to make your app free or paid, as it cannot be altered later.
There is another option to go for any custom Android app development services if you are feeling overwhelmed.